
Building Your First Coil Guide

By: God of Steam
You’ve purchased your RDA, wire and wick. Now you’re ready to build your first coil.
Safety First!
If you build a coil with too little resistance and use it on a device without safeties (like a mechanical APV), you will probably destroy your battery, could destroy your APV, and might get hurt.
Material Choices
Essentially you need two things to build a coil:
There are something like a dozen different materials that can be used for both the wick and the wire, each having its merits and drawbacks. For someone who has never built a coil, the material selection alone can be a stopping point.
Wick Material
Some of the more common materials used for wick include:
Let’s take a look at some of the benefits and drawbacks of these materials.
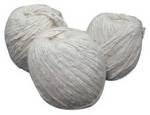
Silica
 Plain twisted silica cord is some of the cheapest and most readily available wick material. Silica is glass, so a torch will not ignite it (at least not a hobby torch), and it takes awhile to even get to the point where it glows. Twisted silica also tends to fray very quickly and can be difficult to thread into coils.
Some people have health concerns with silica, as there are links to lung problems and the inhalation of small quantities of silica. There have been no studies of this in relation to vaping, but if you wash your wicks and rinse your deck after building a coil it should not be an issue.
Ekowool
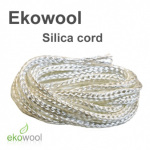 Ekowool improves on twisted silica by using braided construction. This makes it much more resistant to fraying, and (in my opinion) better at wicking. The primary drawback is price; Ekowool is about ten times as expensive as plain twisted silica.
Ekowool comes in two varieties, hollow braid, and hollow braid with internal strands. The hollow braids tend to flatten out, which can make getting good contact with the coil difficult in some configurations (though it is not terribly difficult to achieve).
In theory the braided construction of Ekowool should also reduce the possibilities of small silica particles breaking off of the wick and being inhaled (not that this is very likely to begin with).
Cotton
 Cotton is used primarily because it is cheap, but it also gives excellent flavor. The major drawback of cotton is that it is flammable. When using cotton wicks you must take great care to avoid letting the wick go dry, as it will burn almost instantly if not saturated, and once burned, must be replaced (unless you like a horrid burnt taste in your vape).
Stainless Steel Mesh
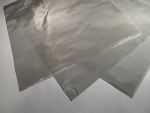 Stainless steel mesh is primarily used in Genesis style RBAs (which are beyond the scope of this post), but is sometimes used in RDAs and recoiling protank heads. Stainless steel mesh is quite expensive (as much as $20 for a 2?x6? piece in some places. It also lasts a really long time and is fairly easy to reuse. Some vape shops and websites sell these as pre rolled wicks for a bit less than sheets or swatches.
The primary concern with using stainless steel mesh as a wick material is that it is raw stainless steel, not galvanized or coated in any way. Aside from buying this from vape specific stores or websites, this material can often be found in (or ordered from) specialty hardware stores. It is mostly used in filtration products.
An interesting thing to note is that the coarser weave mesh (like #325 mesh) will wick better than the finer weave material (like #500 mesh).
The really frustrating part of working with SS mesh is that it is conductive, and must be oxidized very well to prevent shorts. Even with thorough oxidizing (repeated torching and quenching), it is quite easy to scratch the oxidation off and the result is hot spots and shorts.
I do not recommend working with stainless steel mesh or cable for those new to coils.
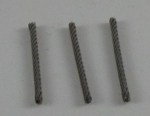
Stainless Steel Cable
 As with Stainless steel mesh, ensuring that the material is raw stainless steel is the primary concern.
Stainless steel cable is most commonly used in Genesis style RBAs, though I have seen some use it in RDAs. I personally find it to be terribly difficult to work with in RDAs. It frays rather easily, and does not do a great job of holding juice (though it can wick very well in vertical wick applications as found in Genesis style RBAs).
As with SS mesh, SS cable is conductive and must be thoroughly oxidized before use, is easy to develop shorts and hot spots, and sometimes frustrating to work with.
These are by no means the only wick materials used in vaping, and the choice of wick material is largely based on individual preference. I like to use Ekowool if using silica, as I personally feel that it is both the least problematic to wrap with, and also provides very good flavor while minimizing the risks and frustrations of silica wick.
Currently I am favoring cotton, and will generally recommend it over any other type of wick.
Wire Material
Common wire material used:
 Kanthal wire has become the standard for vaping, due primarily to its cost and high heat tolerance. Kanthal A1 coils will outlast nichrome coils by a wide margin.
Bakero wire is relatively new to the vaping scene, and is not yet widely available (it’s also ridiculously expensive), but there are people who swear that it is the absolute best wire for coil building in the history of vaping. I have not used it, but the videos I have seen of it in action keep me from dismissing it on price alone. Maybe one day I will find a vendor that sells it in sample sizes and give it a try.
The only factor other than personal preference in determining coil material is the space available on the RDA/RBA, and whether the posts have holes in them. I personally like ribbon kanthal, but it is incredibly difficult to use on an RDA without post holes (like the IGO-L). Some of the smaller atomizers (like the AGT) require using wire with a higher resistance (I wouldn’t want to try to wrap on an AGT with 28g kanthal).
I strongly urge those new to rebuilding to buy a variety of wire sizes to determine what is best for them.
Basic 4/3 (or 5/4) Wrap Coil
 Before we get started here, just know up front that the first coil you wrap is probably not going to work out. Mine didn’t. My first mistake was in not using enough wire, so the coil did not provide enough resistance to fire on my APV (I was using a regulated APV at the time, because I didn’t want to accidentally “discover” what sub ohm vaping was like on my first attempt.
Just figure that the first couple coils are not going to work out, but they are good practice, and you’ll be pleasantly surprised if you nail it on your first attempt.
You’ll hear people refer to a coil as a 3/2 wrap, or a 4/3 wrap. This is nothing more complicated than a count of the loops in the coil. If you look at the picture at the very top of this post, that is a drawing of a 4/3 wrap. There are four loops on one side, and three on the other. So a 5/4 wrap would have one more loop in the coil. Nothing earth shattering, but it can be confusing if you’ve never had it explained.
First you have to decide what size wick and wire you’re going to use. This post could easily get out of hand with all the different possibilities, so I am going to just make arbitrary choices and tell you why I am doing everything here.
For this example I am going to use 30g Kanthal A-1 wrapped on 2mm Ekowool wick in a 4/3 wrap, mounting on an IGO-L. All of those choices are arbitrary, I simply had large quantities of those materials laying around.
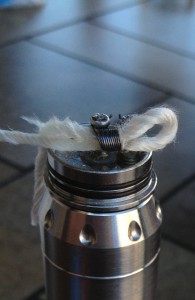
First you need to decide how you want the wick to sit in the RDA. You can get away with just a short length of wick that is not much longer than the coil (shown in the first picture below, ignore the ribbon kanthal), but I like to leave one side a little long to hold a bit more juice as shown in the second picture.
Actually Wrapping The Coil
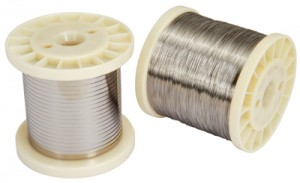
Here are the raw materials of our coil:
That is approximately 6 inches of 30g Kanthal, and about 2.5 inches of 2mm Ekowool.
Both the wire and the wick should be thoroughly torched to remove any residue from the manufacturing process before proceeding. Torching (with a butane torch, not a bic lighter), will make the wire a bit less “springy”, allowing it to hold its shape better. It will also make the Ekowool tighten up and stiffen a bit. Be aware that both of these materials conduct heat very well, and should be held with pliers during the torching.
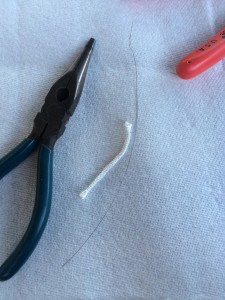
In the picture above, you’ll notice that the cut on the left side of the wick is much cleaner. I cut both sides of the wick with the same snips, the one on the right was done before torching. If you enlarge that picture, you’ll notice some white flecks sitting next to the freshly trimmed side of the wick. This is powdered Ekowool. You do not want to be breathing this stuff, which is why it is important to thoroughly rinse your wick after mounting it to the atomizer deck.
There are basically two ways you can wrap the coil:
I prefer the second method in most cases (though in some cases it is not practical to do it that way). The even sizes of Ekowool are one of those exceptions. Ekowool is a hollow sheath, and in the odd sizes, it is filled with strands of silica wick (or cotton in some cases). When wrapping the even sizes (like the 2mm I am using here), it is simply easier to wrap directly around the wick (unless you are going to double the wick over) because the wick tends to flatten out.
This is personal preference. I find it easier to wrap around something else, mount the coil on the atomizer, and then thread the wick in.
Keep in mind that you don’t want to choke the wick with the coil. You want to allow the wick enough room to draw the juice in to the coil, but still be touching the coil.
Regardless of where you choose to wrap the coil, there are two methods for wrapping a coil:
I prefer to use a tool to wrap coils (something small and rigid to keep the coil straight), as it requires less dexterity to get a decent coil, and can help with mounting the coil to the posts.
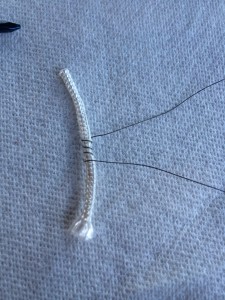
Here is a picture of my freehand 4/3 wrap of 30g Kanthal on a piece of 2mm Ekowool:
Mounting The Coil On The Atomizer Deck
If you wrapped around a tool, don’t remove the tool before you mount the coil to the atomizer. The tool will stabilize the coil during the mounting process. In this case, I did not use a tool, so I just need to be careful not to deform the coil or bend it.
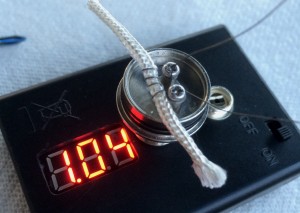
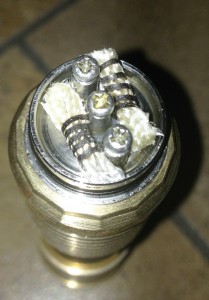
In this image you can see that I have the coil mounted to the atomizer deck. Because I have done this a time or two, I know that there is something not right here, because this coil should be slightly higher in resistance. I will tighten down the screws a bit, clip the coil legs to size, and adjust the coils a bit and check again.
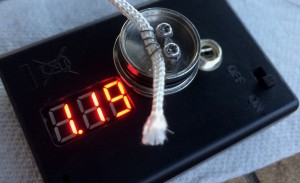
Better. Now If I were planning to use this coil (I’m going to rewrap this with a micro coil and cotton build momentarily), I’d want to get the wick adjusted and test it again before firing it. Since this coil is history in a minute, we’ll call it good and fire it on a mod to see how it heats up.
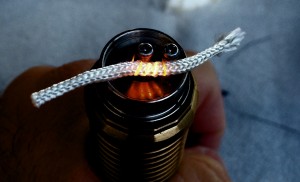
Not a great photo, but you can see that the coils are glowing evenly, and the glow started from the middle of the coil and moved out to the edge.
I always “pulse” the coil a few times (don’t do this with cotton wicks) to ensure it is not going to pop or short. Pulsing is nothing more than firing the mod rapidly until the coils glow brightly with no juice in the wick.
Things To Look Out For
Measuring Resistance On An RDA
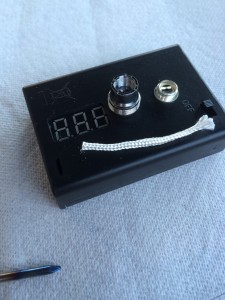
I cannot state this enough: you must check the resistance of your coils before firing them on a device. It is all too easy to short an atomizer and damage your device. Resistance checkers designed specifically for vaping (such as the one seen throughout this post) are relatively cheap (the run about $20 pretty much anywhere), and can save you lots of grief (and prevent the possible destruction of your device).
If all you have is a multimeter, I highly suggest that you buy a pre-wired 510 connection. You can then attach some aligator clips to the pre-wired connection and use those to clip to your multimeter leads.
Why would you go to that trouble when you could just touch the multimeter leads to the atomizer’s 510 connection? Because it’s not as easy as it sounds and requires very steady hands (not to mention a fair bit of dexterity) to get any kind of accurate measurement from a 510 connection using just multimeter probes.
So there you have it. You’ve built your first coil. Now you can try out all the different combinations of wick and wire (not to mention all the different kinds of coils), until you find something that is right for you.
Good luck!